Monday, December 31, 2012
Sunday, November 18, 2012
Covered snaps and buttons
I just finished some sample covered buttons and snaps. The project turned out to more simple than expected and the look well worth the effort. For the snaps, I used backcut up tights hoping that the hole would not run. I am not sure a woven would look as nice. Tights come in on almost every color so I think that is the way to go. For the buttons, I followed the directions on the package. One piece of fabric was interfaced with a very lightweight fusible knit interfacing and the other one was made without a lining. The interfaced button looks nicer because the color is not dulled by the metal of the button back and more closely matches the original fabric.
Saturday, September 22, 2012
Tuesday, August 28, 2012
More on Scallops...
As luck would have it, I found more information on scallops after completing the pillows. I want to include the new found information for future reference.
An odd number of scallops is visually more appealing than an even number.
Calculate the number of scallops; if inches do not divide well, try centimeters.
Make a template from freezer paper. It can temporarily be ironed and removed after marking.
Use a small stitch length for well defined lines.
Pressing and clipping can help create crisp lines. Try to press inside the scallop before turning right side out. After turning and pressing. Clip by staggering the the clip lines on the two layers. This will create a more polished look on sheer fabrics. Press and finger roll the seam line to the inside so the seam line will not not show onthe finish piece.
Saturday, August 25, 2012
Pillow talk...
When self drafting patterns, one has to rely on sewing construction experience to complete the project. There are no assembly and fabric layout instructions like those that come with store bought patterns. This is probably one of the most challenging aspects of using self drafted patterns.
When designing the pillowcase patterns, I had no idea how much ease was needed. I chose a half inch on each side thinking that would make it easier to insert the pillow. For the travel pillows, the ease worked well. For the sofa pillows, I did not use any ease. For a more "stuffed" pillow, I may subtract some from each side....probably 1/4 inch.
Since I was planning on making several matching pillows, I made a paper pattern for each size to use each time.
She sews sea shells by the seashore...
Sewing Scallops
To make the envelope pillows cases special, I decided to add scallops to one edge. I used the printed scallops off the cutting board and picked the size of best fit for the 12 inch square pillow.
To keep the fabric stable and prevent warping, I folded the fabric over to serve as a facing. After stitching along the scallop line, I trimmed the edges, turned the fabric and pressed for a crisp clean look.
The scallop did not lend well to understitching so I relied heavily on the concept of trimming close and very close with the close trim to the outside; the same concept used in armhole and neck facings.
I have since made cases for 14 inch square pillows and adjusted the scallop size accordingly. After a good pressing, I edge stitched the scallop. Edge stitching is more practical but more sophisticated without the edge stitching.
Tuesday, July 31, 2012
Self Drafted Pattern- Envelope Pillowcase
Self drafted envelope pillow cases with scalloped edges. The 12 by 12 inch pillows takes only a half a yard; the same amount of fabric will cover 14 by 14 inch pillows.
Wednesday, April 25, 2012
Keep Calm and Pell On!
A project that is still in the development phase is the organization of interfacing. Every seamstress needs a selection of different interfacings I started keeping each kind in a gallon size zip lock bag with the directions for application and care. I am also in the process of putting together a sample book that has made up pieces with various appropriate fabrics and interfacings so I can use the information to decide on the interfacing for a project.
Tuesday, April 17, 2012
Bernina Bits
I put together a small reference book that will contain the settings of works in progress. Sometimes in the middle of a project, I have to break away from the machine and slip in another project. When I go back, it is difficult to remember the settings for zigzag width, needle position and stitch length.
One side of the page will contain the specs and the other side a small stitched sample.
One side of the page will contain the specs and the other side a small stitched sample.
Wednesday, February 29, 2012
Bernina Bits...
Sometimes I thread my serger and it works perfect and other times it does not. I could not figure out the problem until I came across a general serger book that states that the tension discs are usually controlled by raising and lowering the presser foot.
I went back to instructional manual and reread the threading directions. It clearly states when to raise and lower the presser foot but does not explain the significance of the very specific directions. My life is forever changed as far as threading the serger.
I went back to instructional manual and reread the threading directions. It clearly states when to raise and lower the presser foot but does not explain the significance of the very specific directions. My life is forever changed as far as threading the serger.
Monday, January 23, 2012
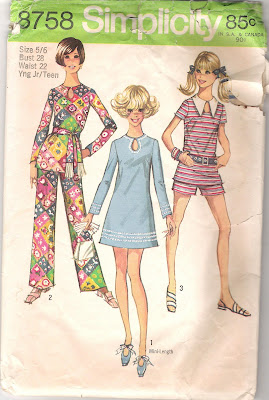
I remember when... Simplicity 8758
View 3 was the version that I made for my very first 4H project. The fabric was white light weight twill with small aqua snowflake like stars. I remember the hardest part was the set in sleeves.
A Lesson in Textiles: Simplicity 7733
In Junior High, my father shipped some silk fabric from Hong Kong back to the states. My mom made a dress using this pattern and some yellow orange silk. As a preteen, I was most disappointed as the the silk was not shiny or shimmery as expected. At the time, I envisioned that silk was more like satin. Despite my disappointment, my first lesson in textiles was a hard lesson learned.
Saturday, January 21, 2012
Tuesday, January 3, 2012
Subscribe to:
Comments (Atom)


